

So I don't know who designed my house but whoever it was did not have children in mind. It is a death trap as far as ledges, edges, and corners goes.
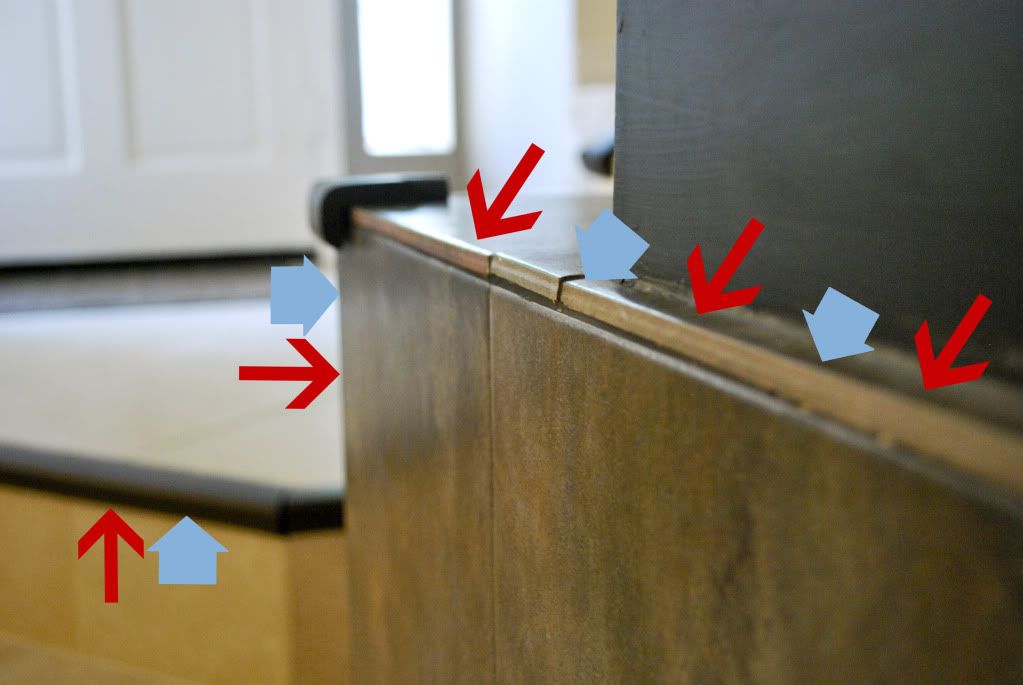
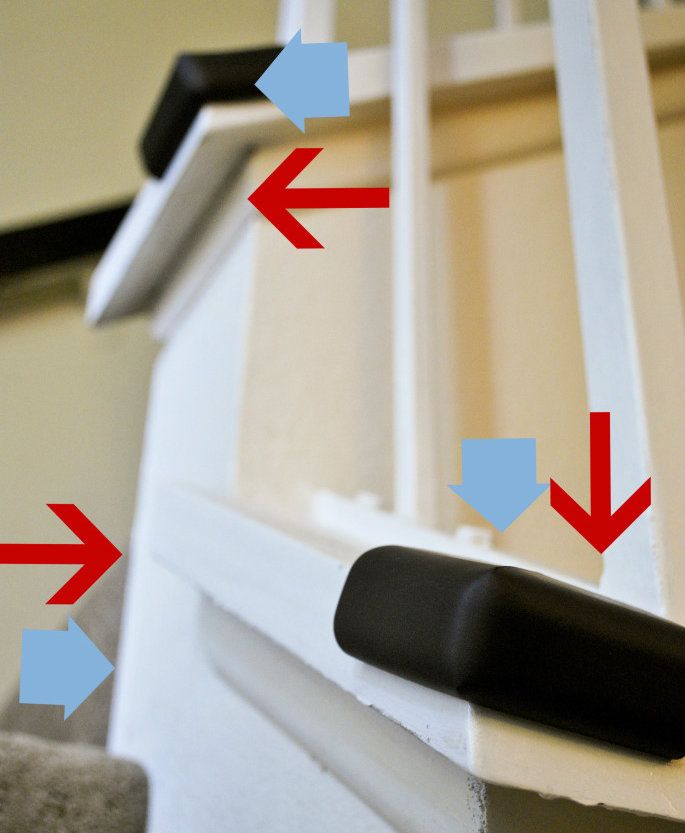
To start out with, the whole first floor is tile. And it's not like it's flat tile. There are steps, ledges, a tile fireplace, an angled staircase... The perfect situation to nail your head for anyone under 2 feet tall. Here's a few shots of what I'm working with:
Mom's Arrows: Danger Zones. Avoid these at all costs.
Girlie's Arrows: Fun Zones. Never leave these spots. Ever.
Now I have taken precautionary measures. We have those little foam edges they sell for like for $20 per 4 inch strip, (really? Can you say price gouge?) But its not like you can wrap your whole house in bubble wrap.
So today I'm in my kitchen doing some dishes with my little girl crawling around me. Next thing I know I hear the signature BANG! followed by crying. Ugh... The girl has managed to nail her head on one of the many corners and I see a gooseberry growing on the spot. Nice one Mom. Fail.
So in honor of the dork that designed my home, I've made some Coal Rice Krispy Treats. Because a bagfull of this is exactly what he should be getting in his stocking this year, he is definitely on the bad list. (or at least he's on mine...) These are a fun twist for the holidays! So spend some time whipping up a batch to give to someone you love. Or don't love...

Coal Rice Krispy Treats
3 Tbsp butter
6 cups marshmallows
1 tsp vanilla
5 cups cocoa krispies**
1 cup crushed oreos
black food coloring (I got this at Michaels with their weekly 40% off coupon, so it was only like a buck, whoo hoo, go get some!)
Pour the rice krispies and oreos in a large mixing bowl. Set aside.
Melt the butter in a saucepan over medium high heat until melted. Turn the heat down to the lowest setting and add the marshmallows. Stir until the marshmallows are mostly all melted (this will take a few minutes--low and slow is key for perfect texture). Add in the vanilla and black food coloring (keep adding until you get the color you want) and finish melting.
Once fully melted, take them off heat and pour over the rice krispies. Stir to combine until everything is black. Dump everything by spoonfuls onto a greased cookie sheet, so they look like funky coal shapes. Allow them to cool about 20 minutes. Enjoy!
** I actually used regular rice krispies, but as you can see there were still a few flecks of white showing through mine. So because hindsight is always better than foresight I recommend using cocoa rice krispies--they'd be easier to dye black. Not that it really matters I guess, just a thought.


Hee hee, I love these. The corners and falling...not so much!
ReplyDeleteGreat idea!
ReplyDeleteMy Grandmother used sponges on the corners of her counters back in the "old days". Lol
ReplyDeleteAround how many does this make?
ReplyDeleteThese coal rice krispy treats are a fun idea. I'll plan to make some for my coworkers. Thanks for posting the recipe.
ReplyDeletePlease help, how much does this recipe yield?
ReplyDeleteThis is pretty close to the Original Rice Krispies Recipe and that makes a 9"x13" pan of gooey goodness. So depending on how big you cut them...I usually get 16 rectangles out of one pan. Hope that helps!
ReplyDeleteAnyone know how these taste?
ReplyDeleteCocoa Rice Krispies have a very distinct flavor that I don't think would mix well with Oreos.. I would probably use regular rice krispies myself.
Their so cute great idea,going make these for Christmas .
ReplyDeleteIs it crushed oreos w the filling inside?
ReplyDeleteI just finished making these. To answer a couple of questions, 1st they taste VERY good. I didn't have any vanilla so had to substitute almond extract but fortunately it's all good! I haven't made Rice Krispie treats in a long, long time and forgot how messy it can be. I washed my hands really well and then buttered them up thoroughly and used my fingers to drop the chunks unto freezer paper. Works a whole lot better than trying to get the sticky goo of a spoon. And, it is indeed crushed Oreos with the filling. I used Oreos with chocolate filling. I made some burlap bags and stenciled "COAL" on the outside. I will put these in plastic bags and stick inside the bags. Fun project for co-workers
ReplyDeleteDid you use Coco-Krispies?
DeleteThe baggies are a cute touch too! Is it mini marshmellows?
DeleteThese look amazing! I am definitely going to try these! Thanks for the recipe!
ReplyDeleteMade these using cocoa crispies and choc creme oreos... Came out GREAT! Looks just like coal!
ReplyDeleteI just made a few batches of the coal treats, they are great! I was short on the black dye, so I added 2 1/2 cups crushed Oreo and went a little lighter on the cocoa krispies. As I was finishing up, I thought it could be nice to have some finely crushed Oreo cookies to then dust the clumps with as they set.
ReplyDeleteI added a few tablespoons of Nutella to my first batch this summer that had the regular rice krispies, and it was delicious. Now I plan to use it again with the cocoa krispies and chocolate-filling Oreos. There are going to be some happy naughty people in my family! I found this summer that it was easier to let them cool in the pan and then take them out for molding into crazy lumps later. I just cut them like I normally would and squished them into free-form lumps.
ReplyDeleteLove the Nutella addition!
DeleteI tried them and used the regular Rice Krispies, and I liked the effect. The outside was all coloured and then when you bit in you get the whitish colour which reminded me of the shiny part of the coal. I also used 2 cups of Oreos, and 7 cups of marshmallows. They turned out great! Warning the dye does make your teeth a bit gray...take pictures before eating lol.
ReplyDeleteThese turned out lovely! Besides premeasuring out ingredients before starting assembly, I like to know (and give) tips that will keep the baker as un-stressed and tear-free as possible. For this recipe, I will share a few ideas that made this an ENJOYABLE process. Before turning on the heat, I generously sprayed PAM on my wide rubber spatula to work the mix stick-free. I also generously sprayed PAM in the large Tupperware mixing bowl before adding 5 cups of krispies. To cook, I used a wok-type, non-stick pan for a WIDE and WARM surface for whipping the melted butter, marshmallows, cookie crumbs, vanilla and food coloring. The low heat and the non-stick pan worked great together. With the greased spoon and greased bowl you will be PLEASED how well the ingredients incorporate when adding the hot melted marshmallow mix to the krispies. You will get a big cohesive ball, neither adhesive to the spoon, nor bowl. Not a drop wasted! FINALLY, black dye (I like Spectrum Gel) is great, but it can TERRIBLY stain your fingers and countertops. I recommend adding drip by drip right from the bottle. Make sure you place the bottle on a paper towel so that you don't stain the counter with a ring. I had a dab of Clorox on a warm wet towel for a quick wipe of the counter ready (because I tend to be a klutz). I needed it! Careful handling of the dye and a well greased equipment keeps the product off your fingers and your hands unstained. GREAT RECIPE SHARE - it was my only executed Pinterest pluck of the season, and a welcome humorous addition to my sweet treat lineup!
ReplyDeleteThanks for all your tips! Glad they turned out!
DeleteThese turned out really... pliable. I put them in a container and they all mushed back together. I even used less marshmallows than the recipe says. Any ideas?
ReplyDeleteHi, I am writing an article for my school on holiday treats and one of my recipes is this adorable coal rice krispy treats. I am in need of a picture, would I be able to use yours?
ReplyDeleteAre there any alternatives to using the dye?
ReplyDeleteI just tried these! Great idea! While I was melting the (mini) mellows I started to worry about the colossal mess I was gonna have to clean up, but it cleans away with water and a brush really easily. While I agree the "Pam" would be realitively helpful, it isn't healthy or necessary in the long run. I did spray the foil that I put on cooling racks for the lumping.
ReplyDeleteBut I do recommend you add more color than you might think. I used a gel color and got a greyish-purple color but passes for black when it isn't next to the nonstick "black" pot.
I would add more "Oreo" next time. I used generic cookies with the white center, which all but disappears with processor. I used peppermint flavor instead of the vanilla, to give it a "holiday" taste. I did try it with choco-krispies and have a few brown spots showing. But you will really have to be inspecting what you are eating to notice. And naughty receivers should not kick the coal mine in the mouth! Lol. Thanks for the recipe!! Love! I was making them thinking that they would be great to give coworkers in a packagepackage like a single cupcake. So mine may be on the large side. Yum.
I like them with the regular cereal. The specks of white add texture. That is why I picked this recipe over the many that come up in a search.
ReplyDeleteI just made these and used regular cereal and got the regular Oreos (not double stuff). I didn't have time to get black dye, so I made my own using a mix of blue, red, and green until it was dark enough and the color turned out great! I think this will be a big hit in my son's Kindergarten class for his Christmas party!
ReplyDeleteI made these for a party and had to use a good amount of black food coloring for them to be black and not purple. Bad idea! Everyone's mouths turned black and (sorry tmi) turned their poop weird colors the next day! I am mortified....WONT make these again!
ReplyDelete:) Sorry for your bad experience! If you're worried about the dye you can always just increase the amount of oreo crumbs. I guess that's just what you have to watch out for when using food coloring!
DeleteThese are so good! I made them with crushed oreos and cocoa rice crispies and also skipped the black dye because I didn't see any at my grocery store. I added another 1/2 cup crushed oreos and i think they turned out dark enough without the dye. After I mixed everything in a bowl, I rubbed a little olive oil on my hands and then hand rolled the coal balls. I tried using spoons like the recipe says but the mix kept getting stuck to the spoons. Anyway this is DELICOUS and will now be my go-to holiday treat recipe. Thanks for sharing!
ReplyDeleteThese are so good! I made them with crushed oreos and cocoa rice crispies and also skipped the black dye because I didn't see any at my grocery store. I added another 1/2 cup crushed oreos and i think they turned out dark enough without the dye. After I mixed everything in a bowl, I rubbed a little olive oil on my hands and then hand rolled the coal balls. I tried using spoons like the recipe says but the mix kept getting stuck to the spoons. Anyway this is DELICOUS and will now be my go-to holiday treat recipe. Thanks for sharing!
ReplyDeletemy in-laws were over for dinner one night when my girlie was 2. she was running through the house, and accident waiting to happen. she had run into the kitchen (which i had waxed the floors earlier) and hit the floor sliding, all the way to the other side, and face first into the wall! so with her new bloody lip and wailing like a banshee, she ran towards the living room. she tripped over a piece of carpeting when coming into the living room, and hit her little face on my TV. Now shes got a cut under her eye, producing a shiner!
ReplyDeletemy mother in law at that time said, "If i hadnt seen it with my eyes, i wouldnt believe it! i thought you were abusing her, but shes clumsy just like you!" all i could do was laugh and agree with her, my girlie inherited my 3 left feet!
Two thumbs up. I like that some didn't get colored, because it looks like used coal....(has already been burned)
ReplyDeleteHow long will they last for - shelf-life-wise? I'm thinking of making some to put in a few stocking this year (for the times they've been naughty throughout the year)..along with presents of course!
ReplyDeleteI was thinking of doing the same thing for my family as a joke this year. You can freeze them for a long time and just take them out when you're ready for them. I made ornament treats last year and that's what I did. I hope this helped :)
DeleteI used black cookie icing instead of dye to color the marshmellows. Came out awesome!
ReplyDeleteI used black cookie icing instead of dye to color the marshmellows. Came out awesome!
ReplyDeleteI just made these for our Christmas get together. I used the limited edition Brownie Batter oreos and skipped the food coloring. Instead I finally crushed a bag of oreos and rolled each lump in it while still warm. Delicious!
ReplyDeleteI just found this and am going to make them for 4 boys that I am doing Christmas for this year. I am even going to give there mom some, along with the rest of the Christmas party that is going to be at my house for Christmas.
ReplyDeleteDoes anyone know the shelf life? I want to make some for an Xmas fete and wondered how far ahead I can make them.
ReplyDeleteWow these are great! I also appreciated all the tips. I used my large non stick wok, never thought of doing that with rice krispie treats before. It will now be my go-to cooking pot for them. I also used a mix of red, green & blue food coloring to make black. And used cocoa krispies & a bit more oreo. I actually did a huge tripe batch to make enough for co-workers and that worked out fine. Spraying my bowl, spoon & hands with non stick spray also really help. I'm excited to hand these out this week to my co-workers, very cute & fun!
ReplyDeleteLooking great work dear, I really appreciated to you on this quality work. Nice post!! these tips may help me for future.
ReplyDeleteTake a look a this link too Click speed Test
I made these tonight to include in platters of assorted Christmas cookies for our friends. I used 2 cups of dark chocolate oreos and no food coloring. They look great and taste amazing!
ReplyDelete